
selecting with the lasso tools
the Magnetic Lasso tool. You can use the Lasso tool to make selections that require
both freehand and straight lines, using keyboard shortcuts to move back and forth
between the Lasso tool and the Polygonal Lasso tool. You’ll use the Lasso tool to
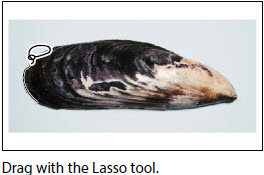
select the mussel. It takes a bit of practice to alternate between straight-line and
freehand selections—if you make a mistake while you’re selecting the mussel,
simply deselect and start again.
1 Select the Zoom tool ( ), and click the mussel until the view enlarges to 100%.
Make sure you can see the entire mussel in the window.
2 Select the Lasso tool ( ). Starting at the lower left section of the mussel, drag
around the rounded end of the mussel, tracing the shape as accurately as
possible. Do not release the mouse button.
3 Press the Alt (Windows) or Option (Mac OS) key, and then release the mouse
button so that the lasso pointer changes to the polygonal lasso shape ( ). Do not
release the Alt or Option key.
4 Begin clicking along the end of the mussel to place anchor points, following the
contours of the mussel. Be sure to hold down the Alt or Option key throughout
this process.

The selection border automatically stretches like a rubber band between
anchor points.
5 When you reach the tip of the mussel, hold down the mouse button as you
release the Alt or Option key. The pointer again appears as the lasso icon.
6 Carefully drag around the tip of the mussel, holding down the mouse button.
7 When you finish tracing the tip and reach the lower side of the mussel, first
press Alt or Option again, and then release the mouse button. Click along the
lower side of the mussel with the Polygonal Lasso tool as you did on the top.
Continue to trace the mussel until you arrive back at the starting point of your
selection near the left end of the image.
8 Click at the start of the selection, and then release the Alt or Option key. The
mussel is now entirely selected. Leave the mussel selected for the next exercise.

the Magnetic Lasso tool. You can use the Lasso tool to make selections that require
both freehand and straight lines, using keyboard shortcuts to move back and forth
between the Lasso tool and the Polygonal Lasso tool. You’ll use the Lasso tool to
select the mussel. It takes a bit of practice to alternate between straight-line and
freehand selections—if you make a mistake while you’re selecting the mussel,
simply deselect and start again.
1 Select the Zoom tool ( ), and click the mussel until the view enlarges to 100%.
Make sure you can see the entire mussel in the window.
2 Select the Lasso tool ( ). Starting at the lower left section of the mussel, drag
around the rounded end of the mussel, tracing the shape as accurately as
possible. Do not release the mouse button.
3 Press the Alt (Windows) or Option (Mac OS) key, and then release the mouse
button so that the lasso pointer changes to the polygonal lasso shape ( ). Do not
release the Alt or Option key.
4 Begin clicking along the end of the mussel to place anchor points, following the
contours of the mussel. Be sure to hold down the Alt or Option key throughout
this process.
The selection border automatically stretches like a rubber band between
anchor points.
5 When you reach the tip of the mussel, hold down the mouse button as you
release the Alt or Option key. The pointer again appears as the lasso icon.
6 Carefully drag around the tip of the mussel, holding down the mouse button.
7 When you finish tracing the tip and reach the lower side of the mussel, first
press Alt or Option again, and then release the mouse button. Click along the
lower side of the mussel with the Polygonal Lasso tool as you did on the top.
Continue to trace the mussel until you arrive back at the starting point of your
selection near the left end of the image.
8 Click at the start of the selection, and then release the Alt or Option key. The
mussel is now entirely selected. Leave the mussel selected for the next exercise.
rotating a selection
So far, you’ve moved, resized, duplicated, and inverted the color of selected areas.
In this exercise, you’ll see how easy it is to rotate a selected object.
Before you begin, make sure that the mussel is still selected.
1 Choose View > Fit On Screen to resize
the image window to fit on your screen.
2 Press Ctrl (Windows) or Command
(Mac OS) as you drag the mussel to the
lower section of the wooden plate. The
pointer changes to the Move tool icon.
3 Choose Edit > Transform > Rotate. The mussel and selection marquee are
enclosed in a bounding box.
0 Response to "selecting with the lasso tools"
Post a Comment