
undoing actions in Photoshop
In a perfect world, you’d never make a mistake. You’d never click the wrong object.
You’d always perfectly anticipate how specific actions would bring your design
ideas to life exactly as you imagined them. You’d never have to backtrack.
For the real world, Photoshop gives you the power to step back and undo actions so
that you can try other options. The next project provides you with an opportunity
to experiment freely, knowing that you can reverse the process.
This project also introduces you to layering, which is one of the fundamental and
most powerful features in Photoshop. Photoshop includes many kinds of layers,
some of which contain images, text, or solid colors, and others that simply interact
with layers below them. The file for this next project has both kinds of layers. You
don’t have to understand layers to complete this project successfully, so don’t worry
about that right now. You’ll learn more about layers in Lesson 4, “Layer Basics,” and
Lesson 9, “Advanced Compositing.”
undoing a single action
Even beginning computer users quickly come to appreciate the familiar Undo command.
Once again, you’ll begin this project by looking at the final result.
1 Click the Mini Bridge tab to open the Mini Bridge panel again. It displays the
contents of the Lesson01 folder.
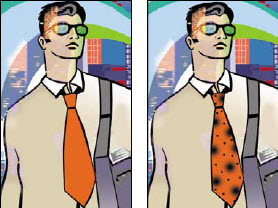 2 Look at the thumbnails for
the 01C_End.psd file and
the 01C_Start.psd file. In the
start file, the tie is solid; in
the end file, it is patterned.
3 In the Content panel, doubleclick
the 01C_Start.psd file
thumbnail to open it in
Photoshop.
4 Double-click the Mini Bridge
tab to close the panel.
5 In the Layers panel, select the Tie Designs layer.
 Notice the arrow in the Tie Designs layer in the
Layers panel. The Tie Designs layer is a clipping
mask. A clipping mask works somewhat like a selection
in that it restricts the area of the image that can
be altered. With the clipping mask in place, you can
paint a design over the tie without worrying about
any stray brush strokes disturbing the rest of the
image. You’ve selected the Tie Designs layer because
it’s the layer you’ll be editing now.
6 In the Tools panel, select the Brush tool ( ), or press B to select it by its
keyboard shortcut.
7 In the options bar, click the brush size to
,+or+press+B+to+select+it+by+its.jpg) display brush options. Then, move the Size
display brush options. Then, move the Size
slider to 65 pixels. In the list of brushes,
select the Soft Round Pressure Size brush.
(The name will appear as a tool tip if you
hover the pointer over a brush.)
If you want to try a different brush, that’s
OK, but select a brush that’s reasonably
close to 65 pixels—preferably between 45
and 75 pixels.
8 Move the pointer over the image so that it appears as a circle the
same diameter
as the brush. Then draw a stripe anywhere in the orange tie. You don’t have to
worry about staying within the lines, because the
 brush won’t paint anything outside the tie clipping
mask.
Oops! Your stripe may be very nice, but the design
calls for dots, so you’ll need to remove the stripe you
just painted.
9 Choose Edit > Undo Brush Tool, or press Ctrl+Z
(Windows) or Command+Z (Mac OS) to undo the
Brush tool action.
The tie is again a solid orange color, with no stripe.
undoing multiple actions
The Undo command reverses only one step. This is a practicality, because
Photoshop files can be very large, and maintaining multiple Undo steps can tie
up a lot of memory, which tends to degrade performance. You could use the Step
Backward command to undo additional steps one at a time. However, it’s faster and
easier to step back through multiple actions using the History panel.
1 Using the same Brush tool settings, click once over the (unstriped) orange tie to
create a soft dot.
2 Click several more times in different areas on the tie to create a pattern of dots.
3 Choose Window > History to open the History panel. Then drag a corner of the
History panel to resize it so that you can see more steps.


• To undock a panel or panel group so that it becomes a floating panel or panel
group, drag its title bar or panel tab away from the dock.
expanding and collapsing panels
You can resize panels to use screen space more efficiently and to see fewer or more
panel options, either by dragging or clicking to toggle between preset sizes:
• To collapse open panels to icons, click the double arrow in the title bar of the
dock or panel group. To expand a panel, click its icon or the double arrow.


In a perfect world, you’d never make a mistake. You’d never click the wrong object.
You’d always perfectly anticipate how specific actions would bring your design
ideas to life exactly as you imagined them. You’d never have to backtrack.
For the real world, Photoshop gives you the power to step back and undo actions so
that you can try other options. The next project provides you with an opportunity
to experiment freely, knowing that you can reverse the process.
This project also introduces you to layering, which is one of the fundamental and
most powerful features in Photoshop. Photoshop includes many kinds of layers,
some of which contain images, text, or solid colors, and others that simply interact
with layers below them. The file for this next project has both kinds of layers. You
don’t have to understand layers to complete this project successfully, so don’t worry
about that right now. You’ll learn more about layers in Lesson 4, “Layer Basics,” and
Lesson 9, “Advanced Compositing.”
undoing a single action
Even beginning computer users quickly come to appreciate the familiar Undo command.
Once again, you’ll begin this project by looking at the final result.
1 Click the Mini Bridge tab to open the Mini Bridge panel again. It displays the
contents of the Lesson01 folder.
2 Look at the thumbnails forthe 01C_End.psd file and
the 01C_Start.psd file. In the
start file, the tie is solid; in
the end file, it is patterned.
3 In the Content panel, doubleclick
the 01C_Start.psd file
thumbnail to open it in
Photoshop.
4 Double-click the Mini Bridge
tab to close the panel.
5 In the Layers panel, select the Tie Designs layer.
Notice the arrow in the Tie Designs layer in theLayers panel. The Tie Designs layer is a clipping
mask. A clipping mask works somewhat like a selection
in that it restricts the area of the image that can
be altered. With the clipping mask in place, you can
paint a design over the tie without worrying about
any stray brush strokes disturbing the rest of the
image. You’ve selected the Tie Designs layer because
it’s the layer you’ll be editing now.
6 In the Tools panel, select the Brush tool ( ), or press B to select it by its
keyboard shortcut.
7 In the options bar, click the brush size to
slider to 65 pixels. In the list of brushes,
select the Soft Round Pressure Size brush.
(The name will appear as a tool tip if you
hover the pointer over a brush.)
If you want to try a different brush, that’s
OK, but select a brush that’s reasonably
close to 65 pixels—preferably between 45
and 75 pixels.
8 Move the pointer over the image so that it appears as a circle the
same diameter
as the brush. Then draw a stripe anywhere in the orange tie. You don’t have to
worry about staying within the lines, because the
brush won’t paint anything outside the tie clippingmask.
Oops! Your stripe may be very nice, but the design
calls for dots, so you’ll need to remove the stripe you
just painted.
9 Choose Edit > Undo Brush Tool, or press Ctrl+Z
(Windows) or Command+Z (Mac OS) to undo the
Brush tool action.
The tie is again a solid orange color, with no stripe.
undoing multiple actions
The Undo command reverses only one step. This is a practicality, because
Photoshop files can be very large, and maintaining multiple Undo steps can tie
up a lot of memory, which tends to degrade performance. You could use the Step
Backward command to undo additional steps one at a time. However, it’s faster and
easier to step back through multiple actions using the History panel.
1 Using the same Brush tool settings, click once over the (unstriped) orange tie to
create a soft dot.
2 Click several more times in different areas on the tie to create a pattern of dots.
3 Choose Window > History to open the History panel. Then drag a corner of the
History panel to resize it so that you can see more steps.
The History panel records the recent actions you’ve performed in the image. The
current state is selected, at the bottom of the list.
4 Click an earlier action in the History panel, and notice how the image changes.
Several actions are undone.
5 In the image window, create a new dot on the tie with the Brush tool.
Notice that the History panel has removed the dimmed actions that were listed
after the selected history state and has added a new one.
6 Choose Edit > Undo Brush Tool or press Ctrl+Z (Windows) or Command+Z
(Mac OS) to undo the dot you created in step 5.
Now the History panel restores the earlier listing of dimmed actions.
7 Select the state at the bottom of the History panel list.
The image is restored to the condition it was in when you finished step 2 of
this exercise.
By default, the Photoshop History panel retains only the last 20 actions. This is
a compromise, striking a balance between flexibility and performance. You can
change the number of levels in the History panel by choosing Edit > Preferences >
Performance (Windows) or Photoshop > Preferences > Performance (Mac OS) and
entering a different value for History States.
using a context menu
Context menus are short menus that contain commands and options appropriate to
specific elements in the work area. They are sometimes referred to as “right-click”
or “shortcut” menus. Usually, the commands on a context menu are also available
in some other area of the user interface, but using the context menu can save time.
1 If the Brush tool ( ) is not still selected in the Tools panel, select it now.
2 In the image window, right-click (Windows) or Control-click (Mac OS)
anywhere in the image to open the Brush tool context menu.
Context menus vary with their context, of course, so what appears can be a menu
of commands or a panel-like set of options, which is what happens in this case.
3 Select a finer brush, such as the Hard Round brush, and change the size to 9
pixels. You may need to scroll up or down the list in the context menu to find
the right brush.
4 In the image window, use the selected brush to create smaller dots on the tie.
5 As it suits you, use the Undo command and the History panel to backtrack
through your painting actions to correct mistakes or make different choices.
6 When you finish making changes to your tie design, choose File > Save if you
want to save your results, choose File > Save As if you want to save the file in
another location or with a different name, or close the file without saving.
Give yourself a pat on the back for finishing another project.
More about panels and panel locations
Photoshop panels are powerful and varied. Rarely would you need to see all panels
simultaneously. That’s why they’re in panel groups, and why the default configurations
leave some panels unopened.
The complete list of panels appears in the Window menu, with check marks by
the names of the panels that are open at the front of their panel groups. You
can open a closed panel or close an open one by selecting the panel name in the
Window menu.
You can hide all panels at once—including the options bar and Tools panel—by
pressing the Tab key. To reopen them, press Tab again.
You already used panels in the panel dock when you used the Layers and Swatches
panels. You can drag panels to or from the panel dock. This is convenient for bulky
panels or ones that you use only occasionally but want to keep handy.
You can arrange panels in other ways, as well:
• To move an entire panel group, drag the title bar to another location in the
work area.
• To move a panel to another group, drag the panel tab into that panel group
so that a blue highlight appears inside the group, and then release the
mouse button.
• To dock a panel or panel group, drag the title bar or panel tab onto the top of
the dock.

• To undock a panel or panel group so that it becomes a floating panel or panel
group, drag its title bar or panel tab away from the dock.
expanding and collapsing panels
You can resize panels to use screen space more efficiently and to see fewer or more
panel options, either by dragging or clicking to toggle between preset sizes:
• To collapse open panels to icons, click the double arrow in the title bar of the
dock or panel group. To expand a panel, click its icon or the double arrow.
• To change the height of a panel, drag its lower right corner.
• To change the width of the dock, position the pointer on the left edge of the
dock until it becomes a double-headed arrow, and then drag to the left to widen
the dock, or to the right to narrow it.
• To resize a floating panel, move the pointer over the right, left, or bottom edge
of the panel until it becomes a double-headed arrow, and then drag the edge in
or out. You can also pull the lower right corner in or out.
• To collapse a panel group so that only the dock header bar and tabs are visible,
double-click a panel tab or panel title bar. Double-click again to restore it to the
expanded view. You can open the panel menu even when the panel is collapsed.
Notice that the tabs for the panels in the panel group and the button for the panel
menu remain visible after you collapse a panel.
special notes about the tools panel and options bar
The Tools panel and the options bar share some characteristics with other panels:
• You can drag the Tools panel by its title bar to a different location in the work
area. You can move the options bar to another location by dragging the grab bar
at the far left end of the panel.
• You can hide the Tools panel and options bar.
However, some panel features are not available or don’t apply to the Tools panel or
options bar:
• You cannot group the Tools panel or options bar with other panels.
• You cannot resize the Tools panel or options bar.
• You cannot stack the Tools panel or options bar in the panel dock.
• The Tools panel and options bar do not have panel menus.
0 Response to "5-undoing actions in Photoshop"
Post a Comment